Pumpkin Sourdough With A Cinnamon Swirl Layer
This pumpkin sourdough bread is perfect for fall and winter. Made with a beautiful cinnamon swirl layered throughout the dough, it's an amazing sweet bread with a delicious pumpkin flavor. Once you make this sourdough pumpkin bread recipe, you’re gonna want to make it again and again! It is SO delicious!
Equipment
- Large Mixing Bowl
- Measuring cups
- Danish whisk
- Bench scraper
- Bread Lame Scoring Tool or Razor Blade
- Banneton proofing basket (you can also use a towel lined bowl – see video below)
- parchment paper
- cast iron dutch oven (optional)
- Kitchen Twine
Ingredients
- 1 cup pumpkin puree
- ¾ cup warm water
- ¼ cup maple syrup
- ½ cup sourdough starter
- 3 ½ cups flour
- 1 Tbl. salt
Instructions
Feed Starter
- Feed starter 4-12 hours before mixing up your dough
Mix Ingredients
- In a large bowl, add pumpkin, maple syrup, water, active sourdough starter, and flour. Mix until it comes together into a shaggy dough. Leave it for 15-30 minutes to “autolyse”. This just means you’re giving the flour a chance to absorb the water and the starter.
- Add the salt and “mix” into the dough with a circular motion similar to how a mixer would mix the dough (see video below). Let sit for another 15-30 minutes.
Create Structure In Your Dough
- Begin creating structure in your dough by doing a series of stretch and folds, a coil fold or two and/or lamination every 15-30 minutes. You will know your dough has good structure when it holds it shape and starts getting some bubbles on top. Sometimes I only do 2-3 stretch and folds before letting it bulk ferment if I’m in a hurry, but I try to also do 2-3 coil folds and one lamination.
Bulk Ferment
- Cover bowl with a loose fitting lid like a plate and leave it in the bowl at room temperature for 2-3 hours to bulk ferment.
Shape
- Turn dough out onto the counter. If making more than one loaf at a time, divide the dough with a bench scraper. Wet your hands so the dough doesn’t stick to them, and gently spread dough out in a rectangle as thin as you can without tearing it. Sprinkle dough with pumpkin pie spice or cinnamon and brown sugar. Take ⅓ of the dough from one side of the rectangle and fold it towards the middle. Do the same with the other side of the dough, bringing it to the center. Place another layer of the cinnamon and brown sugar on the dough. Roll up the dough into a ball and gently create surface tension on the dough by pushing it away from you and then pulling it back towards you several times. (See video below). This tension is what will help create good oven spring – which helps the dough rise in the oven instead of spreading out. When doing an inclusion like this with sugar, you want to try to keep the sugar from popping through the top of the loaf. If it does, cover it over as best you can, otherwise it can burn.
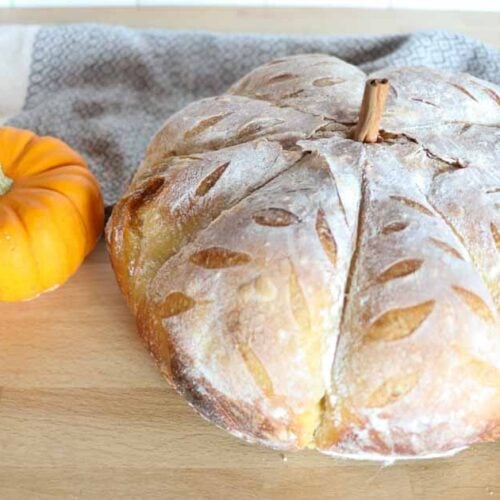
How To Make The Loaf Look Like A Pumpkin (Optional)
- Lay out four 24” lengths of string in a circle grid. If the string is pretty soft, you can roll the string in flour to help it not stick to your loaf. Place the loaf upside down right in the middle of the strings. Pull the strings gently around the loaf and tie each of them together on the top. These are what will create the indentations on the loaf that make it look like a pumpkin.
Cold Ferment
- Place dough upside down in a banneton or tea towel and flour lined bowl. Cover with cloth or plastic wrap and place in the refrigerator for 2-12 hours. Keep in mind that the dough will raise some while in the refrigerator, but it may not double in size like yeast bread. It does a lot of its raising while baking. Remember, this is very different than baking regular yeast bread.
Preheat Oven
- Place dutch oven in your oven and preheat at 450 degrees.
Score
- When oven is hot, take sourdough out of the refrigerator and dump it out onto a piece of parchment paper. Your dough should still be holding it’s shape. Brush gently with flour (rice flour makes the scoring stand out the best, but regular flour works fine too). Score the dough with short a bread lame or sharp knife with little shallow cuts between the strings.
Bake
- Remove dutch oven from pre-heated oven. Remove lid and quickly place parchment paper with bread on it into the hot dutch oven. Replace lid and quickly place it back into the oven. Place a baking sheet on the rack under the dutch oven so the bottom of your bread doesn’t end up too hard and crusty.
- Reduce heat to 425 degrees and bake for 25 minutes.
- Remove the lid if using a dutch oven.
- Bake for 15 more minutes until the loaf is a nice golden brown.
- Remove bread from oven and place on a cooling rack.
Slice and Enjoy
- For best results, wait until bread is cool to slice. Sometimes I can’t wait that long, and slice it sooner. The bread can look gummy if you slice it to soon, but it is so good with fresh butter that sometimes I do it anyway.
- The easiest way to slice this pumpkin sourdough bread is to cut it in half, and then lay the halves flat and slice.
- I like to eat this bread with fresh butter for breakfast, or with homemade butter and local honey for any meal of the day. The cinnamon sugar swirl is just amazing! Not too sweet, but sweet enough to really be enjoyable. This bread would make the perfect centerpiece for your Thanksgiving table.
- If you try this recipe and love it, please come back and give it 5 stars! Tag me on Instagram @wagonwheelhomestead21
Notes
