Easy Sourdough Croissant Bread Recipe
This easy sourdough croissant bread recipe has lots of golden flaky butter layers that remind me of a croissant. Simple and easier to make than traditional croissants, this bread gets it's flaky layers from the addition of grated butter to the dough during the bread making process. Similar to my artisan sourdough bread, this recipe is actually my favorite way to make sourdough bread. If I'm not careful, I can sit down and eat the whole loaf because the buttery flaky goodness is hard to resist.
Equipment
- 1 mixing bowl
- 1 Measuring cups
- 1 Danish Dough Whisk
- 1 Bench scraper
- 1 Bread Lame Scoring Tool or Razor Blade
- 1 Banneton basket (you can also use a towel-lined bowl – see video)
- 1 parchment paper
- 1 Cast Iron Dutch Oven (optional)
Ingredients
- ½ cup sourdough starter
- 1 ½ cups warm water
- 3 ½ cups flour
- 1 Tbl salt
- ½ cup frozen butter, grated
Instructions
- Feed StarterFeed starter 4-12 hours before mixing up your dough
- Mix IngredientsIn a medium bowl, add water and active sourdough starter. To the wet ingredients, add the flour and the salt. Mix it until a shaggy dough forms. Let the dough rest for 15-30 minutes to “autolyse”. This just means you’re giving the flour a chance to absorb the water and the starter.Grate your refrigerated or frozen butter using a cheese grater, keeping it as cold as possible. Add the cold butter to the dough and gently mix it in during the first set of stretch and folds (see below). These layers of butter spread throughout the dough is what will create the flaky layers when the dough bakes.Create Structure In Your DoughBegin creating structure in your dough by doing a few sets of stretch and folds, coil folds and/or lamination every 15-30 minutes. You will know your dough has good structure when it holds its shape and starts getting some bubbles on top. Sometimes I only do 2-3 stretch and folds before letting it bulk ferment if I’m in a hurry, but I also try to do 2-3 coil folds and one lamination.
- Bulk FermentCover bowl with a loose fitting lid like a plate and leave it in the bowl at room temperature for 2-3 hours to let the dough rise and bulk ferment, being careful not to let the dough get too warm because you want to keep the butter cool to create those flaky layers in the dough. You can check the dough temperature if you
- ShapeTurn dough out on clean surface with the top of the dough facing down. Gently spread the dough out until it’s in a very thin layer. This is called the lamination process and it creates really good layers in your dough. Fold each side of the dough towards the middle, and then fold the ends in towards the middle. Carefully add tension to the dough by pushing it away from you, and then pulling it back. (See video).
- Cold FermentPlace dough upside down in a banneton or tea towel and flour lined bowl. Cover with cloth or plastic wrap and place in the refrigerator for 2-12 hours. Keep in mind that the dough will rise some while in the refrigerator, but it may not double in size like yeast bread. It does a lot of its rising while baking. Remember, this is very different than baking regular yeast bread.
- Preheat OvenThere are two ways you can bake this bread. In a dutch oven or without a dutch oven as an “open baked” loaf. My favorite way is using a dutch oven, but either method works well. If using the dutch oven method, be sure to place your dutch oven in your oven while it preheats to 450 degrees.
- ScoreWhen oven is hot, take the chilled dough out of the refrigerator and dump it out onto a piece of parchment paper. Your dough should still be holding it’s shape. Slash the top of the dough with whatever design you prefer, even just a simple "X" is fine. You can also do an optional egg wash on top of the dough by brushing it with a beaten egg if you want it to be extra golden on top.
- Bake
- Dutch Oven MethodRemove dutch oven from pre-heated oven. Remove lid and quickly place parchment paper with bread on it into the hot dutch oven. Replace lid and quickly place it back into the oven. Place a baking sheet on the rack under the dutch oven so the bottom of your bread doesn’t end up too hard and crusty.
- Open Bake MethodPlace parchment paper with bread on it onto a baking sheet or pizza stone and place it into the oven. Below it place a baking sheet or pan and pour boiling water into it to create steam. This will help to give your bread a crispy crust with a fluffy inside and will replicate the dutch oven baking.Reduce heat to 425 degrees and bake for 25 minutes. Remove the lid if using a dutch oven. Bake for 15 more minutes until the loaf is a nice golden brown.Remove bread from oven and place on a wire rack to cool.
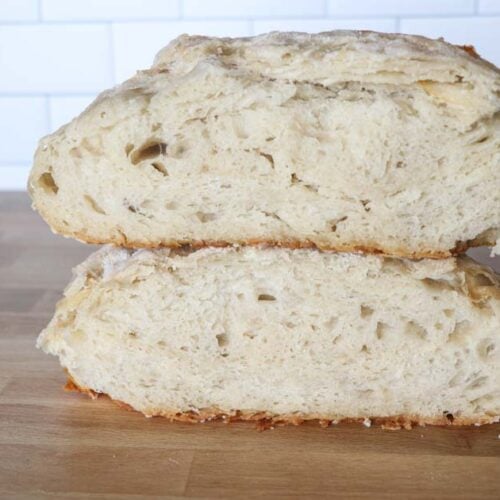
- Slice and EnjoyFor best results, wait until bread is cool to slice with a sharp knife. Sometimes I can’t wait that long, and slice it sooner. The bread can look gummy if you slice it too soon, but it is so good with fresh butter that sometimes I do it anyway.The easiest way to slice artisan-style sourdough bread is to cut it in half, and then lay the halves flat and slice.Store leftover bread in an airtight container in the refrigerator for up to a week.I hope you enjoy the taste of buttery sourdough croissants without all the work of actually making croissant dough.
Notes
If you have a weak or runny sourdough starter, you’re gonna have flat and sloppy dough. It’s really important to start with a strong and active starter. Learn how to make a healthy sourdough starter without using a scale here. When you’re preparing to make bread especially, be sure to mix your starter thickly – with more flour than water. You want your starter to have a thick pancake-like consistency.
Work with your dough every few minutes until it has good structure and holds it shape (see video below).
Don’t overferment your dough. Try not to forget the dough sitting on the counter for more than 2-3 hours during the bulk fermentation time. If you overferment your dough it won’t hold it’s shape and will be a sloppy mess. If you get interrupted before the bulk ferment is done and need to leave, just put it in the refrigerator. You can always shape it after it’s been in the refrigerator. Once again, it’s very flexible, but try not to let it sit out on the counter until it ferments into a sloppy ball or it won’t raise much in the oven. I like to refrigerate or freeze my butter before grating it as it makes it so much easier to grate. You may see some butter leak out of the loaf as it bakes, but you'll still have beautiful buttery layers of bread that are so delicious.
