How To Can Apples | Preserving Apples For Pie (Video)
Learning how to can apples was game changer for me when it came to preserving apples. I like apple pie filling, but it can be time consuming to make, and then you’re really only able to make pie with it. These canned apple slices are simple and easy to make, and can be used for many different apple recipes throughout the year. They stay slightly crisp even after being canned, and they can be easily turned into pie, muffins, coffee cake, and apple crisp without the apples turning mushy. I use these apples to make a quick apple crisp or pie everytime I need a last minute dessert. I love having them on my pantry shelf because I can make a from scratch apple dessert in 5 minutes or less without any peeling or cooking. Serve it with some fresh homemade ice cream, and your family will love you for it.
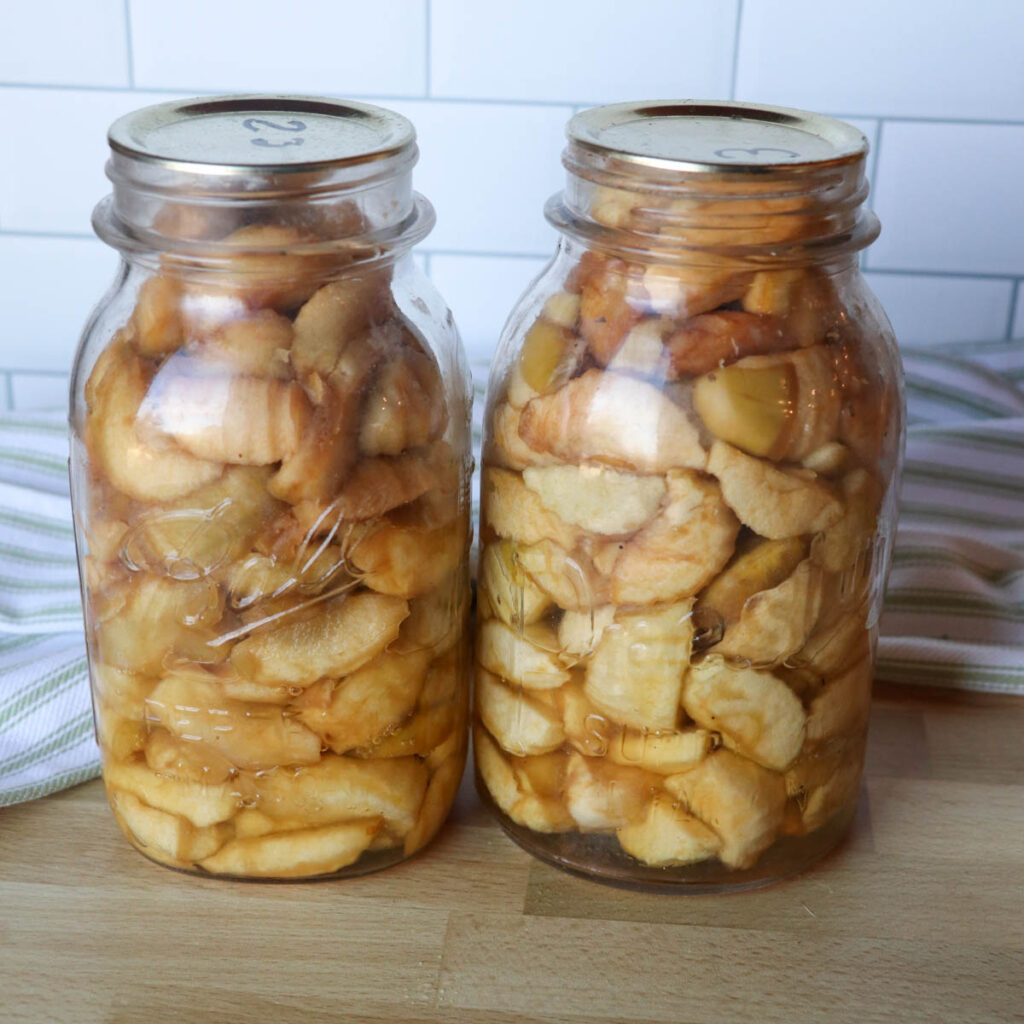
The process for canning these apple slices is also very simple. You just layer raw apple slices in a 5 gallon bucket or other straight sided container with sugar until you fill the container. Then you put a weight on the apples overnight. This presses the juice out of them and helps preserve their crispiness even after canning. The following day you put the apple slices into jars, warm the juice that was created by pressing the apples and pour it over the apples in the jars. Then process in a boiling water bath canner, and just like that you have beautiful fresh crispy apple slices that are shelf stable.
Sourcing Fresh Apples
When we started our homestead in 2015, the first thing we did was plant fruit trees. Here in Nebraska we grow in a zone 4b so we had to make sure to buy fruit trees that would survive in our long cold winters. It took about 8 years for the trees in our apple orchard to produce their first big apple harvest. Prior to that I would always ask around during apple season and see if anyone had extra apples on their trees that they would let me come pick for free. A lot of times elderly people have apple trees and even though they don’t can as much as they used to, they don’t want to see the fruit go to waste. They will usually gladly let you have it if you come and pick it. I’ve canned hundreds of quarts of these canned apple slices and applesauce that way to help fill our homestead pantry.

Another option is to purchase organic apples in bulk from a local farm (although there aren’t any near where we live). Apples can also be purchased in bulk from Azure Standard, an online grocery store that delivers once a month to a drop location near you. They are a great source for fruits and veggies, as well as dry goods for your pantry shelves.
The best apples for making canned apple slices is any kind of larger slicing apple that is easy to peel and slice. My favorite apples from our orchard are the honey crisp apples because they are large, sweet, and delicious. We also grow honey gold, which are similar to golden delicious. They are a nice yellow apple that is easy to store in the refrigerator for fresh eating.
Preserving Apples
There are many ways to preserve apples. I make applesauce, apple juice, apple jelly, apple butter, dried apples, canned apple slices and apple cider vinegar. Apples will also keep for a long time in a root cellar or in a plastic bag in the refrigerator. They can also be frozen, but I like to keep as many things canned as possible to save on freezer space and also in case I ever lose a freezer or electricity for a long period of time.
For lots of other canning recipes and tips on preserving food, click here.
Simple Ingredients
Tips For Canning Apple Slices
- Keep some of your nicest blemish free apples in the refrigerator for fresh eating during the winter. The rest of your nice apples work well for making canned apple slices, because they are easy to run through a peeler corer slicer which saves a lot of time.
- The blemished or small and medium apples are much easier to make into applesauce and apple juice, so it pays to sort through your apples before preserving them.
- We have found that the easiest way to peel apples is by attaching a drill to a peeler corer slicer. It makes peeling apples really fast and it’s something that kids enjoy doing (see video below).
- If you have extra syrup left after filling your apple jars, just put it into jars and can it all by itself. Then you can easily make apple syrup for sourdough pancakes by just adding a little cornstarch and heating it up. It's my family's favorite thing.
How To Can Apples FAQ
The easiest way to can apples is by using this method of pressing the apples in sugar overnight, and then canning them in their own juice the following day. It’s a simple process and leaves the apples crisp and perfect for baking.
Apples do not have to be cooked before canning. They can be raw packed into jars, but it’s best if they are pressed in sugar first as it keeps them from getting mushy while being canned.
The best way of preserving apples depends on what you want to do with them. Drying apples is a very simple process, but so is making apple sauce and canned sliced apples. I prefer canning or dehydrating as the apples will last longer than in a freezer, and it’s better to have your food preserved without being dependent on an electric freezer.
Yes! Apples are a higher acid food, and can be preserved using a water bath canner.
It depends on the varieties of apples you get of course, because some are juicier and meatier than others, but my guess is that you'll get about 15 quarts of canned apples per bushel. This is partly due to the fact that the apples shrink a lot when their juice is pressed out, and then you can pack more of them into a jar.

This post contains affiliate links, which means I make a small commission at no extra cost to you. See my full disclosure here
How To Can Apples
Peel, slice and core apples. It’s preferable to use a drill connected to a peeler/corer/slicer if you are doing a lot of apples (see video). The peeler/corer/slicer makes apple rings and it's best to cut them in half with a sharp knife so they will fit in the jars more easily.


Place apple slices into the bottom of your bucket or other straight sided container. I never measure, but what you want to do is put about 3-4 inches of apples in your bucket, and then sprinkle them with 1 cup sugar. If you want to measure figure 1 cup of sugar per 6-8 cups of apple slices.

Layer apples, then sugar, then apples, then sugar until you run out of apples or fill the bucket. Whichever comes first.
Put a plate or other flat surface over the apples in the bucket.

Place a 10-15 pound weight on the plate so it presses down on the apples. (A gallon can of food like tomato paste works well for this).
Allow it to sit overnight which will press the juice out of the apples.
Canning Process
The next day, scoop the apples out of the bucket and pack them into narrow mouth jars.

In a large stockpot, heat up the juice or syrup that is left in the bucket. Watch it carefully so it doesn't boil over.
Pour the hot syrup over the jars. If you have more juice than you need, pour the extra juice into jars, and can it just like you can the apples. It is the best apple syrup you will ever eat and is perfect for sourdough pancakes. If you don't have enough juice from the apples, just fill them as full as you can and then top them off with some boiling water to within ½" of the top of the jar.

Wipe jar rim with a damp cloth to make sure there is no sticky juice on them.
Place lids and rings on jars and hand tighten.
Process in a boiling water canner for 20 minutes.

Remove from canner using jar lifter and allow to cool at room temperature and seal. If you're doing more than one canner load of apples, it is best to add a little cold water before you put another round of cold jars into the boiling hot water. This will help prevent any jars from breaking. You don't want to lose any of those precious apples after all that hard work.

Remove rings, wash outside of jars if they are sticky, and then store on your pantry shelves.
If you try this recipe and love it, please come back and give it 5 stars! Tag me on Instagram @wagonwheelhomestead21
Pin For Later


How To Can Apple Slices
Equipment
- Apple Picker
- sharp knife – for cutting out bad spots in the apples
- apple peeler corer slicer
- cutting board
- Apple slicer (optional) - use if you don’t have a peeler/corer/slicer
- Food Safe Bucket - I like to use a 5 gallon bucket for pressing the apples
- Large pot – for boiling the apple sugar syrup
- Narrow Mouth Quart Jars
- measuring cup – for ladling the syrup into the jars
- For Jars Canning Lids
- Water Bath Canner
- jar lifter
- Camp Chef Outdoor Stove – for outdoor canning.
Ingredients
- Apples
- Sugar
Instructions
- Peel, slice and core apples. It’s preferable to use a drill connected to a peeler/corer/slicer if you are doing a lot of apples (see video). The peeler/corer/slicer makes apple rings and it's best to cut them in half with a sharp knife so they will fit in the jars more easily.
- Place apple slices into the bottom of your bucket or other straight sided container. I never measure, but what you want to do is put about 3-4 inches of apples in your bucket, and then sprinkle them with 1 cup sugar. If you want to measure figure 1 cup of sugar per 6-8 cups of apple slices.
- Layer apples, then sugar, then apples, then sugar until you run out of apples or fill the bucket. Whichever comes first.
- Put a plate or other flat surface over the apples in the bucket.
- Place a 10-15 pound weight on the plate so it presses down on the apples. (A gallon can of food like tomato paste works well for this).
- Allow it to sit overnight which will press the juice out of the apples.
- The next day, scoop the apples out of the bucket and pack them into narrow mouth jars.
- In a large stockpot, heat up the juice or syrup that is left in the bucket. Watch it carefully so it doesn't boil over.
- Pour the hot syrup over the jars. If you have more juice than you need, pour the extra juice into jars, and can it just like you can the apples. It is the best apple syrup you will ever eat and is perfect for sourdough pancakes. If you don't have enough juice from the apples, just fill them as full as you can and then top them off with some boiling water to within ½" of the top of the jar.
- Wipe jar rim with a damp cloth to make sure there is not sticky juice on them.
- Place lids and rings on jars and hand tighten.
- Process in a boiling water canner for 20 minutes.
- Remove from canner using jar lifter and allow to cool at room temperature and seal. If you're doing more than one canner load of apples, it is best to add a little cold water before you put another round of cold jars into the boiling hot water. This will help prevent any jars from breaking. You don't want to lose any of those precious apples after all that hard work.
- Remove rings, wash outside of jars if they are sticky, and then store on your pantry shelves.
Notes
Tips For Canning Apple Slices
Keep some of your nicest blemish free apples in the refrigerator for fresh eating during the winter. The rest of your nice apples work well for making canned apple slices, because they are easy to run through a peeler corer slicer which saves a lot of time. The blemished or small and medium apples are much easier to make into applesauce and apple juice, so it pays to sort through your apples before preserving them. We have found that the easiest way to peel apples is by attaching a drill to a peeler corer slicer. It makes peeling apples really fast and it’s something that kids enjoy doing (see video below). If you have extra syrup left after filling your apple jars, just put it into jars and can it all by itself. Then you can easily make apple syrup for sourdough pancakes by just adding a little cornstarch and heating it up. It’s my family’s favorite thing.Pin For Later


Great
This is such a great idea, definitely going to make!
Great Toya e available for quick pies, cobblers, crisps etc
Game changer! Only way I will can apples now. But just a question, no lemon juice?
No lemon juice is needed because the apples are already acidic enough, and pressing them in sugar preserves them. The canning is just to keep any oxygen from getting to them. Hope that makes sense! And yes, these are a total game changer.