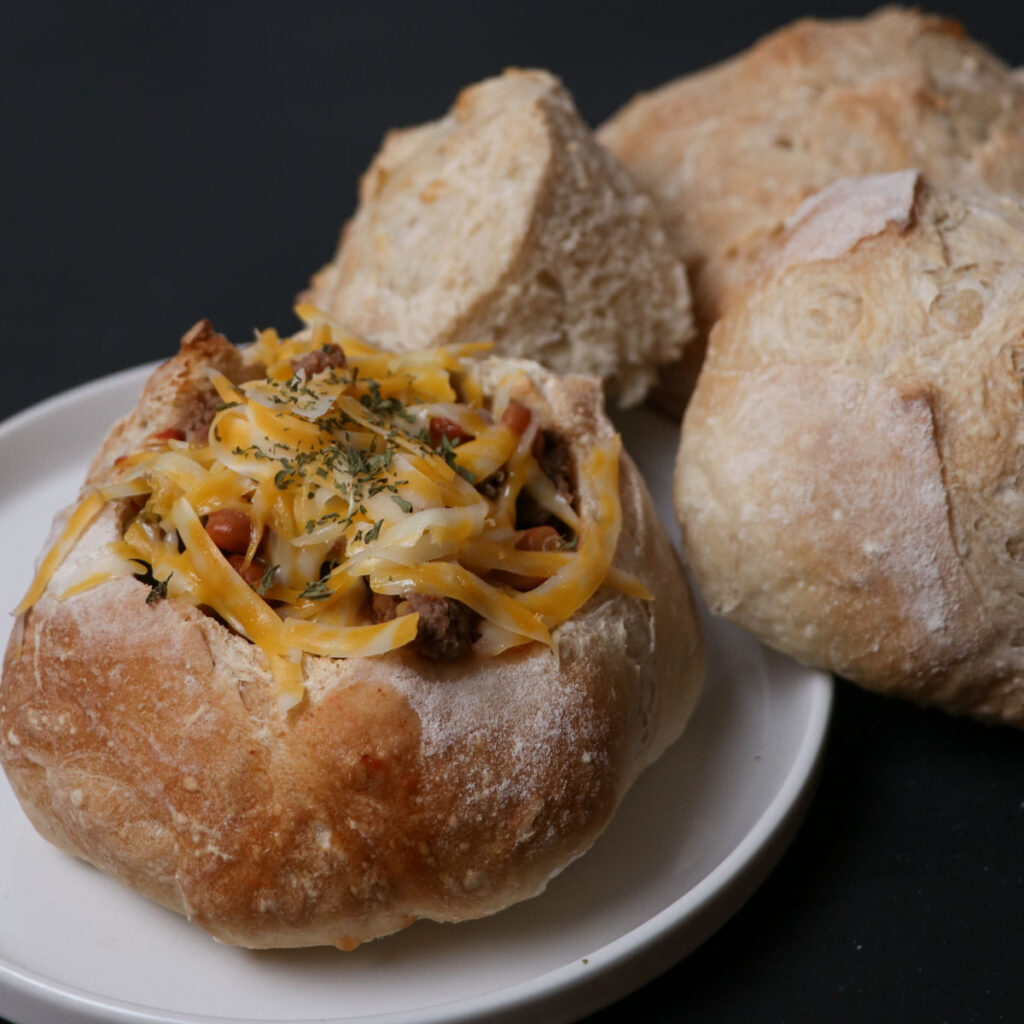
Easy Sourdough Bread Bowls (With Video Tutorial)
This easy recipe for sourdough bread bowls is perfect for soups and stews in the wintertime. Anytime I serve soup in bread bowls, my family gets so excited because it looks like I went to a lot of extra effort. I get excited because it doesn’t take a lot of extra effort to make these, and because they’re made with sourdough, I know they are the healthiest option for my family.
Quick Look: Easy Sourdough Bread Bowls
- ⏱️ Prep Time: 6 hours
- 🍳 Cook Time: 30 minutes (plus 15 minutes to rest)
- 🕒 Total Time: 6 hrs, 30 minutes
- 👥 Servings: 8
- 📊 Calories: ~398 kcal per serving (based on nutrition panel)
- 🔥 Cook Method: Oven-baked in dutch oven.
- 👩🍳 Flavor Profile: Mildly tangy with a classic sourdough taste, chewy interior, and a crusty, slightly crisp exterior.
- ⭐ Difficulty: Easy – beginner-friendly, basic mixing, shaping, and baking.
SUMMARIZE & SAVE THIS CONTENT ON
Jump to:
- Quick Look: Easy Sourdough Bread Bowls
- Favorite Soups For Sourdough Bread Bowls
- Why You’ll Love These Homemade Sourdough Bread Bowls
- Tips
- Simple Ingredients
- Example of Timing For Making Sourdough Bread Bowls
- Keys To Success
- Easy Sourdough Bread Bowls FAQ
- How To Make Sourdough Bread Bowls
- Pin For Later
- Easy Homemade Sourdough Bread Bowls
- More Recipes Like This
These homemade bread bowls can be made with or without a mixer, and can be made all in the same day, or long-fermented for a day or two in the refrigerator. And if you don’t end up using them all as bread bowls, you can just eat the rest of them like mini sourdough boules with butter and jam.
Because we raise most all of our own food and eat what we store up in our homestead pantry, we are mainly consuming storage crops like potatoes, carrots and squash in the winter. We also have a lot of canned vegetables, and all of these put together make the most delicious array of soups and stews. I also keep our favorite canned vegetable soup made of a mix of garden veggies on our pantry shelf for those times when I need a really quick meal. I like to serve bread alongside these wintertime soups because it is not only delicious, but adds some bulk to the meal so little tummies don’t hungry quite so fast. Serving soup in bread bowls is easy, and a fun way to add the bread to your meal during soup season.
Favorite Soups For Sourdough Bread Bowls
- Broccoli cheese soup
- Cowboy chili
- French onion soup
- Creamy sausage and sauerkraut soup
- Baked potato soup
- Cheeseburger soup
- Chicken and noodle soup
- Vegetable Soup
- Tomato soup
- Wild rice soup


In addition, phytic acid is an anti-nutrient that blocks absorption of the nutrients found in wheat. During the sourdough fermentation process, the phytic acid gets broken down and the nutrients are more bio-available to the body. This is why baking with sourdough is so important for our health.
Why You’ll Love These Homemade Sourdough Bread Bowls
- Easy - the process for making sourdough bread bowls is very similar to how you would make a round sourdough boule. Once you understand that process, these will be easy for you to make. To learn how I make my artisan sourdough bread, click here.
- Flexible - these bread bowls can be mixed up by hand with a few stretch and folds, or you can put all the ingredients in your stand mixer and let it do the mixing for you. Mix them up in the morning or at night, depending on your schedule and when you’ll want to bake them.
- Simple - made with just flour, water and salt, this classic sourdough bread dough has an amazing flavor and can be made with ingredients you have on hand.
- Delicious - the chewy tangy sourdough soaked up with your favorite soup is the best part of these bread bowls. I enjoy the soup, but my favorite part is getting to eat the sides of the bread bowls where the soup is soaked into the bread. Yum!

Tips
- These sourdough bread bowls bake up best on a pre-heated flat cast iron pan or pizza stone.
- You’ll want to add boiling water to a separate pan in your oven to create a steam environment. This is necessary to help create a beautiful chewy crust on the sourdough bread bowls.
- I rarely measure any ingredients with a scale, but if you are new to sourdough, you may want to do so until you get a feel for the dough. After you know what you’re doing, it’s easy to just measure in cups.
- To make the hole in the middle of the bread bowl, I just use a bread knife and cut vertically around the edges of the bread bowl. Then I gently lift out the inside with a spoon.
- I like to serve the middle of the bread bowl on the side and dip it into my soup. More of that delicious bread soaked in creamy soup…yum!
- A bench scraper is helpful for dividing the dough into pieces before shaping the bread bowls.

Simple Ingredients
Example of Timing For Making Sourdough Bread Bowls
Option 1
- Before bed feed sourdough starter
- 8:00 a.m. the next morning mix ingredients
- 8:30 a.m. add salt and begin stretch and folds over 2-3 hours
- 11:00 a.m. bulk Ferment for 2-3 hours
- 2:00 p.m. put in refrigerator
- 5:00 p.m. shape and bake in time for supper
Option 2 (this would work great if you work away from the house all day)
- 7:00 a.m. Feed your sourdough starter
- 5:30 p.m. Mix your ingredients
- 5:45 p.m. Add salt and begin your stretch and folds every 15 minutes (since this will be a tigher timeline)
- 7:00 p.m. Bulk ferment on counter for 2 hours
- 9:00 p.m. Put into the refrigerator
- 6:00 a.m. Shape and Bake
Keys To Success
Thick active sourdough starter
If you have a weak or runny sourdough starter, you’re gonna have flat and sloppy dough. It’s really important to start with a strong and active starter. Learn how to make a healthy sourdough starter without using a scale here. When you’re preparing to make bread especially, be sure to mix your starter thickly – with more flour than water. You want your starter to have a thick pancake like consistency.
Create Good Internal Structure In Your Dough
Work with your dough every few minutes until it has good structure and holds it shape (see video below).
Don’t Overferment
Don’t overferment your dough. Try not to forget the dough sitting on the counter for more than 2-3 hours during the bulk fermentation time. If you overferment your dough it won’t hold it’s shape and will be a sloppy mess. If you get interrupted before the bulk ferment is done and need to leave, just put it in the refrigerator. You can always shape it after it’s been in the refrigerator. Once again, it’s very flexible, but try not to let it sit out on the counter until it ferments into a sloppy ball or it won’t raise much in the oven.
Easy Sourdough Bread Bowls FAQ
Sourdough starter is a fermented mix of flour and water that has captured the wild yeast that is in your environment. It uses this yeast to raise your bread so you don’t have to purchase store bought yeast in order to make sourdough artisan bread. As long as you have access to flour, water and salt, you can make this traditional bread.
Yes! The bread bowls aren’t just for holding the soup, they are for eating as well. I like to eat the soup out of the center and then tear the bread bowl into pieces and eat it. It’s my favorite part!
They probably have a sourdough component, but in their ingredients they list yeast, which means they are most likely not real long fermented sourdough. It’s much healthier and less expensive to just make your own.
Using a serrated knife, but around the top of the bowl vertically. Then gently scoop out the middle and add your soup or stew.
Yes, sourdough bread bowls are healthier than bread bowls made with yeast because the phytic acid is broken down during the fermentation process. A lot of people that are gluten intolerant can eat long-fermented sourdough bread without any digestion issues. Sourdough bread also has a lower glycemic index than regular yeast bread and when eaten with a meal it actually lowers the glycemic level of the entire meal. This is really important for people that are diabetic. More information on the glycemic level of sourdough bread here.
The best flour to use is a bread flour with a protein content of at least 11-14%. My favorite flour for bread baking is from Azure Standard. However, you can make these bread bowls with whatever flour you have on hand. I’ve made these many times with bleached all purpose flour and they turn out just fine. If you plan to use whole wheat or whole grain flour, it’s best to make to use half whole grain and half all purpose flour.
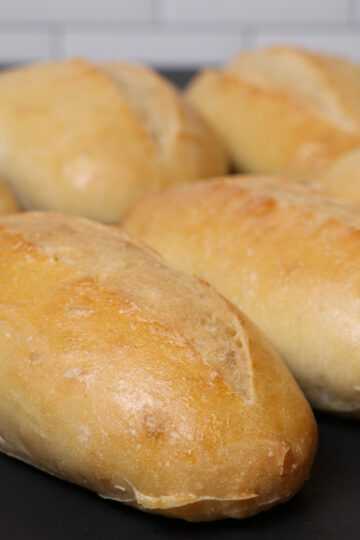
They are small round sourdough boules with the centers cut out and then filled with a soup or stew.
Sourdough bread keeps a lot longer than regular yeast bread because of the fermentation process it goes through while being made. If you keep these bread bowls wrapped in a beeswax wrap or even in a plastic bag, they will keep on your counter for up to a week.
Yes, you can freeze sourdough bread bowls. Just wrap it in plastic wrap or place it into a freezer bag and freeze for up to 3 months. To thaw, set it out on the counter until it comes to room temperature. Can be reheated in 350 degree oven for 15 minutes for a fresh chewy sourdough texture.
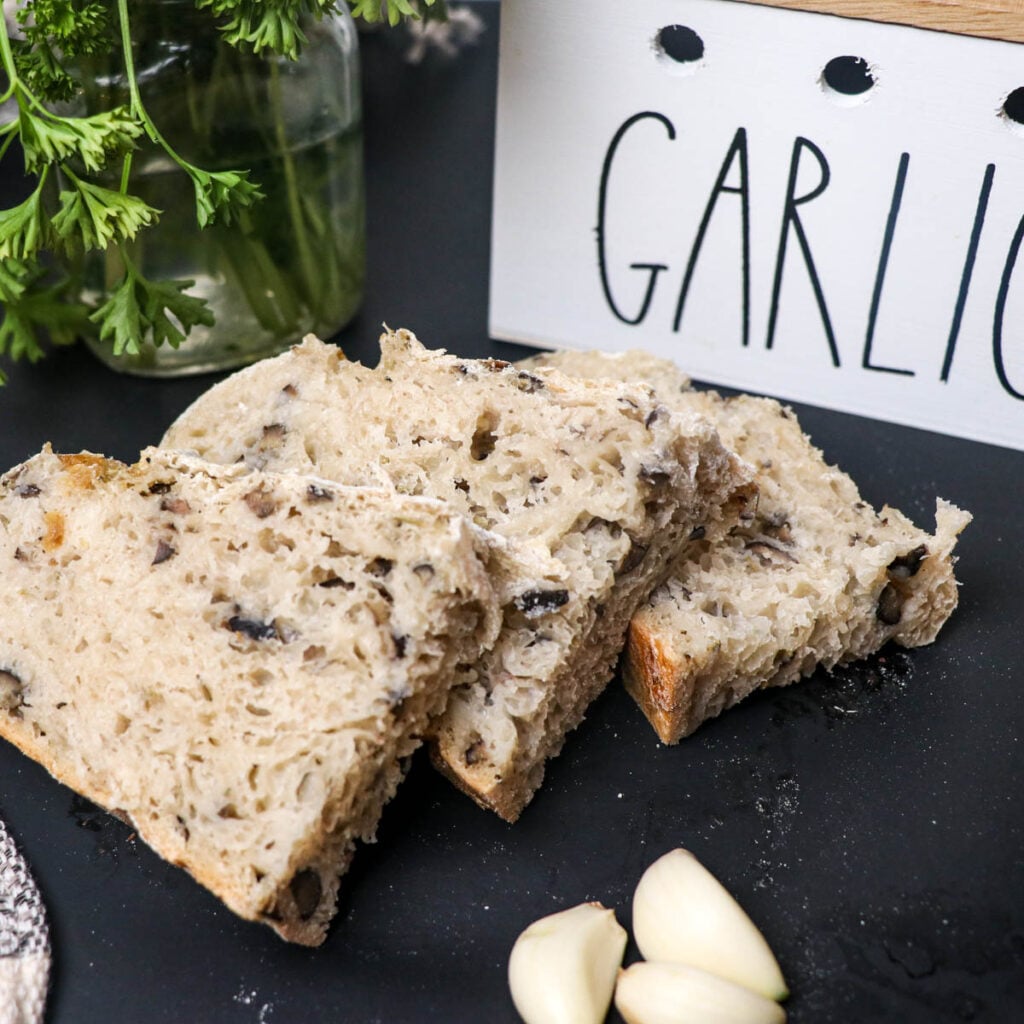
Making different flavors of sourdough bread bowls is very simple. You can easily add “inclusions” into the dough as you are mixing it or shaping it. Our favorites are jalapeno cheddar and rosemary garlic.


This post contains affiliate links, which means I make a small commission at no extra cost to you. See my full disclosure here
How To Make Sourdough Bread Bowls
Feed Starter
Feed starter 4-12 hours before mixing up your dough
Mix Ingredients
In a large bowl, add water, active sourdough starter, and flour. Mix until it comes together into a shaggy dough. Leave it for 15-30 minutes to “autolyse”. This just means you’re giving the flour a chance to absorb the water and the starter.


Add the salt and “mix” into the dough with a circular motion similar to how a mixer would mix the dough (if you’re in a hurry you can mix in the salt when you first mix up the dough). Let sit for another 15-30 minutes.

Create Structure In Your Dough
Begin creating structure in your dough by doing a series of stretch and folds, coil folds and/or lamination every 15-30 minutes. You will know your dough has good structure when it holds its shape and starts getting some bubbles on top. Sometimes I only do 2-3 stretch and folds before letting it bulk ferment if I’m in a hurry, but if I have the time I try to also do 1-2 coil folds and one lamination.


Bulk Ferment
Cover bowl with a loose fitting lid like a plate and leave it in the bowl at room temperature for 2-3 hours to bulk ferment. It's okay if your dough doesn't puff up as much as mine did.

Cold Ferment
Place the bowl of dough in the refrigerator to do it’s cold ferment. This will help the dough to firm up and make it easier to shape and score.
Preheat Oven
Preheat your oven to 450 degrees with your cast iron or pizza stones in the oven.
Shape
Tear off two pieces of parchment paper at least the size of your baking stone. Turn dough out onto the counter. Using a bench scraper, divide the dough into 8 equal portions.
Shape the bread bowls by tucking the edges of each ball of dough underneath itself. Create surface tension on the ball by pushing it away from you and then pulling it back towards you several times. (See video). Place four bread bowls on each piece of parchment paper.

Score
Score the top of the dough about ¼” deep with a simple cross. This will encourage the bread bowls to expand upwards.

Bake
Place a 9” x 13” pan on the bottom rack of your hot oven. Pour some boiling water into pan to create steam in your oven. This will help to give your bread a crispy crust with a fluffy inside and will replicate dutch oven baking.
Using the pizza peel, quickly place the bread bowls that are on the parchment onto the pre-heated stones.

Reduce heat to 425 degrees and bake for 20 minutes or until golden brown.
Remove from oven and place on a cooling rack.
Can brush the tops with butter if desired.
Slice and Enjoy
Using a sharp knife cut a hole vertically around each bread bowl and gently lift out the insides of the bread bowls. Place bread bowls into individual serving bows and fill with your favorite soup or stew. The bread bowls can be frozen for up to 6 months.

Pin For Later


Easy Homemade Sourdough Bread Bowls
Equipment
- 1 Large Mixing Bowl
- 1 Measuring cups
- 1 Danish Dough Whisk
- 1 Bench scraper
- 1 Bread Lame Scoring Tool or Razor Blade
- 1 parchment paper
- 1 Cast iron pizza pans or pizza stones
- 1 Pizza Peel for easily sliding the bread bowls into the oven
- 1 9" x 13" baking dish for adding steam to the oven
- 1 Sweetwater electric tea kettle for quickly heating the boiling water
- 1 Sharp serrated knife for cutting out the insides of the bread bowl
Ingredients
- 3 cups warm water
- 1 cup active sourdough starter
- 7 cups all purpose or bread flour
- 2 tablespoon salt
Instructions
Feed Starter
- Feed starter 4-12 hours before mixing up your dough
Mix Ingredients
- In a large bowl, add water, active sourdough starter, and flour. Mix until it comes together into a shaggy dough. Leave it for 15-30 minutes to “autolyse”. This just means you’re giving the flour a chance to absorb the water and the starter.
- Add the salt and “mix” into the dough with a circular motion similar to how a mixer would mix the dough (if you’re in a hurry you can mix in the salt when you first mix up the dough). Let sit for another 15-30 minutes.
Create Structure In Your Dough
- Begin creating structure in your dough by doing a series of stretch and folds, coil folds and/or lamination every 15-30 minutes. You will know your dough has good structure when it holds its shape and starts getting some bubbles on top. Sometimes I only do 2-3 stretch and folds before letting it bulk ferment if I’m in a hurry, but if I have the time I try to also do 1-2 coil folds and one lamination.
Bulk Ferment
- Cover bowl with a loose fitting lid like a plate and leave it in the bowl at room temperature for 2-3 hours to bulk ferment.
Cold Ferment
- Place the bowl of dough in the refrigerator to do it’s cold ferment. This will help the dough to firm up and make it easier to shape and score.
Preheat Oven
- Preheat your oven to 450 degrees with your cast iron or pizza stones in the oven.
Shape
- Tear off two pieces of parchment paper at least the size of your baking stone. Turn dough out onto the counter. Using a bench scraper, divide the dough into 8 equal portions. Shape the bread bowls by tucking the edges of each ball of dough underneath itself. Create surface tension on the ball by pushing it away from you and then pulling it back towards you several times. (See video). Place four bread bowls on each piece of parchment paper.
Score
- Score the top of the dough about ¼” deep with a simple cross. This will encourage the bread bowls to expand upwards.
Bake
- Place a 9” x 13” pan on the bottom rack of your hot oven. Pour some boiling water into pan to create steam in your oven. This will help to give your bread a crispy crust with a fluffy inside and will replicate dutch oven baking.
- Using the pizza peel, quickly place the bread bowls that are on the parchment onto the pre-heated stones.
- Reduce heat to 425 degrees and bake for 20 minutes or until golden brown.
- Remove from oven and place on a cooling rack.
- Can brush the tops with butter if desired.
Notes
- These sourdough bread bowls bake up best on a pre-heated flat cast iron pan or pizza stone.
- You’ll want to add boiling water to a separate pan in your oven to create a steam environment. This is necessary to help create a beautiful chewy crust on the sourdough bread bowls.
- I rarely measure any ingredients with a scale, but if you are new to sourdough, you may want to do so until you get a feel for the dough. After you know what you’re doing, it’s easy to just measure in cups.
- To make the hole in the middle of the bread bowl, I just use a bread knife and cut vertically around the edges of the bread bowl. Then I gently lift out the inside with a spoon.
- I like to serve the middle of the bread bowl on the side and dip it into my soup. More of that delicious bread soaked in creamy soup…yum!
- A bench scraper is helpful for dividing the dough into pieces before shaping the bread bowls.


So good, so fun