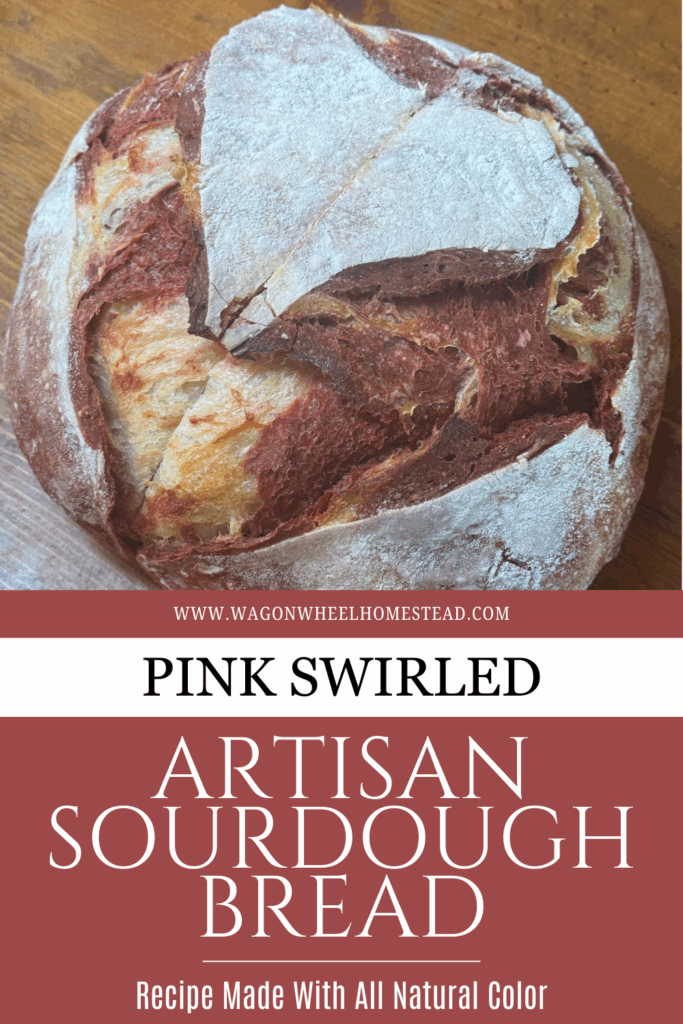
Pink Swirled Artisan Sourdough Bread Recipe Made With All Natural Color
This pink swirled artisan sourdough bread recipe made with all natural beet root powder and no artificial dyes or pigments. Perfect for a Valentine’s Day dinner along with some sourdough pasta and home canned spaghetti sauce. This is a great beginners recipe very similar to my plain artisan sourdough bread recipe.

Quick Look: Pink Swirled Artisan Sourdough Bread
- ⏱️ Prep Time: 10 minutes
- 🍳 Cook Time: 40 minutes (plus 12 hour ferment time)
- 🕒 Total Time: 12 hrs, 50 minutes
- 👥 Servings: 1 loaf
- 📊 Calories: ~356 kcal per serving (based on nutrition panel)
- 🔥 Cook Method: Oven-baked in dutch oven
- 👩🍳 Flavor Profile: Mildly tangy with a classic sourdough flavor, slightly nutty and wheaty with a soft interior and crisp crust.
- ⭐ Difficulty: Medium – requires fermentation, shaping, and basic sourdough technique.
SUMMARIZE & SAVE THIS CONTENT ON
Jump to:
- Quick Look: Pink Swirled Artisan Sourdough Bread
- Why You’ll Enjoy This Pink Artisan Sourdough Bread Recipe
- Ways We Like To Eat Pink Sourdough Bread
- My Experience
- History of Artisan Sourdough Bread
- Artisan Sourdough Made Simple
- Pink Sourdough Bread Ingredients
- Understanding The Basic Process
- Example of Timing For Making Artisan Sourdough Bread
- Keys To Success
- Frequently Asked Questions
- How To Make This Pink Artisan Sourdough Bread Recipe
- Pin For Later
- Pink Swirled Artisan Sourdough Bread Recipe
- Keys To Success
The all natural colorant that makes this fun bread look pink or red is organic beet root powder. It’s not only healthy for you, but looks beautiful and doesn’t change the flavor of the bread at all. It just makes it look pretty and like you went to a lot of work to make something that was actually very simple to make.
Why You’ll Enjoy This Pink Artisan Sourdough Bread Recipe
- It’s perfect for Christmas, Valentine’s Day or even Fourth Of July Celebrations.
- This beautiful bread looks like it took a lot of time to make when actually it takes hardly any effort.
- You can add fun inclusions like white chocolate chips or dried fruit into the bread to make it even more delicious.

Ways We Like To Eat Pink Sourdough Bread
- Delicious slathered with homemade butter and served alongside your favorite soup.
- It’s great sliced, then spread with butter, garlic salt, and mozzarella cheese and toasted in the oven for garlic toast.
- Perfect alongside some homemade sourdough pasta and home-canned spaghetti sauce.
My Experience
I’ve been working with sourdough for over 15 years, and over time I’ve learned a lot of tips and tricks for success that I’m here to share with you. My goal is to make sourdough baking simple for you. Sourdough does not need to take over your life – it can easily fit into the margins of your day. If you follow the steps in this recipe, you’ll learn the art of working with sourdough, and have the satisfaction of making delicious fresh sourdough bread for you and your family.
History of Artisan Sourdough Bread
When you make artisan sourdough, you’re following in the footsteps of our ancestors as they made artisan sourdough bread around the fire with just the simple ingredients they had available. Flour, water and salt is all that is needed to make this incredible gut healthy and life giving bread. In the old days and during simpler times, bread was considered the staff of life, and was a part of every meal. This was before commercial yeast was available, so the only way to make a risen loaf of bread was with sourdough.

As I follow this traditional method of bread baking, I like to think of all the mothers and grandmothers during the homesteading days of this country who mixed up the daily loaf of bread before climbing aboard their covered wagon on their way to the homestead of their dreams. They may have given it a quick stretch and fold when they stopped for lunch, and by the time they pitched camp for the night, the bread was ready for baking.
This hands off, and flexible approach to bread making worked well for those women trying to keep their families fed while traveling to and building their homesteads. Homesteading was a lot of work, unpredictable and challenging in those days just the same as it can be today. Finding a simple and easy approach to making beautiful bread is what suits my busy homestead life today, and I think you’ll find that it’s flexibility suits your life as well.
Artisan Sourdough Made Simple
Remember, back in the early homestead days they didn’t have scales, timers, fancy equipment and probably didn’t even follow a sourdough recipe. They just knew how much flour and water to mix with their starter to make their bread. This is the kind of understanding I want to give you for the sourdough bread making process. You likely won’t feel super comforable with it until you’ve made it a few times, but practice makes perfect, and if you happen to have a failed batch, you can always turn it into amazing bread crumbs and still use it in your cooking.
Just jump in and start, and you’ll be surprised at how quickly the sourdough process becomes intuitive for you. The printable recipe below is measured in cups similar to how our ancestors might have measured their ingredients. I will also give measurements in grams for those that have a scale and want to be more precise in measuring their ingredients.

Pink Sourdough Bread Ingredients
Flour, water, salt, sourdough starter and organic beet root powder is all that is needed to make this bread. It always amazes me what you can make with such simple ingredients. You can use any kind of flour in this pink sourdough bread. Bleached or unbleached all purpose flour, bread flour, or even whole grain flour. Unbleached flour is obviously healthier for you, and bread flour will make a more beautiful loaf than just all purpose flour because it is higher in protein, but any of these flours will work. If you use whole grain or whole wheat flour, I suggest using at least half all purpose or bread flour when making your bread for best results. A loaf made with 100% whole grain flour will be more dense than you will like.

Understanding The Basic Process
I think it’s helpful to gain an understanding of the basic process for making artisan sourdough bread. There are a lot of well meaning folks that like to make sourdough baking super scientific and difficult to understand, but I want you to know that it’s actually a very simple process. While this may seem like a lot of steps, once you understand each one you will realize they are actually very easy to follow. The hands on time for making this loaf of bread is less than 15 minutes total, and there is no kneading required. Most of the time the bread dough will just be sitting on your counter doing it’s thing, and you can be getting a lot of other things accomplished.
Feed Your Starter
A few hours before you want to mix up a loaf of bread, you’ll want to feed your sourdough starter. I like to keep mine in the refrigerator when I’m not baking a lot, so I usually just pull it out of the refrigerator, put a little bit in a jar and feed it with some flour and water. Then let it set out on the counter for a few hours. I like to feed my starter at night in preparation for baking the next day.
Combine Ingredients
To make the pink swirled sourdough bread, you’re gonna mix the pink dough in one bowl. In another bowl you’ll mix some regular sourdough. Then at the end we will swirl the doughs together to make a simple yet beautiful bread.
In one bowl, mix the flour, water, beet root powder and active sourdough starter for the pink dough. In another bowl, mix the flour, water, and active sourdough starter for the plain dough. After a few minutes add in some salt to each bowl.

Create Structure In Your Dough
Then you’ll begin a series of stretch and folds, coil folds and/or lamination every 15-30 minutes on each bowl of dough until the dough is smooth, glossy and holds it shape well. This is much easier than kneading dough, and is explained in detail in the video below. I do not get super technical about doing it every 15 minutes. I just do a stretch and fold whenever I think about it. If I’m super busy I will set a timer for myself, because otherwise I might forget the bread altogether.
Once the dough holds it’s shape well, you know its time to continue on with the bulk fermentation process.
Bulk Ferment
Then we let both bowls of dough set out on the counter at room temperature for a couple of hours to bulk ferment. This allows the sourdough starter to fully take over all the flour and water and start to raise the bread. This is where the health benefits of sourdough bread come from, because all of the phytic acid in the flour is broken down during the fermentation process making this bread much easier for your body to digest.

Shape the bread
After the bulk fermentation process is over, you’ll shape the bread by spreading the plain dough out on your counter. Then spread the pink dough over the top of the plain dough. Roll it up to make the swirl in the bread.
Cold Ferment
Place it in the refrigerator for 2-12 hours. This slows down the fermentation process and develops flavor in the bread. The longer you leave the dough in the refrigerator, the more sour it will become. Before refrigeration, loaves were just baked as soon as they were shaped if it was during the summer. And if it was during the winter they might have left it to cold ferment overnight depending on how cold it was.
Bake The Bread
Pre-heat the oven and if using a dutch oven preheat it as well. Pull the bread dough out of the refrigerator, brush with flour, score and bake.

That’s it! This pink artisan sourdough bread can easily be made during the margins of your day. The process can change a bit depending on if it’s winter or summer and the temperature of your home. My favorite part about making sourdough bread is how flexible it is. If I get called away after only a couple stretch and folds, my bread will sit on the counter and be ready for me to continue with it whenever I come back. Also, if you get interrupted and won’t be back for awhile, you can always put your dough in the refrigerator at any point during the process and come back to it later. That is definitely not something you can with regular yeast bread as easily.
Example of Timing For Making Artisan Sourdough Bread
Sourdough bread is so flexible, it can fit into any schedule. Here’s a couple of examples of how you could fit sourdough baking into the margins of your day.
Option 1
- Before bed feed sourdough starter
- 8:00 a.m. the next morning mix ingredients
- 8:30 a.m. add salt and begin stretch and folds over 2-3 hours
- 11:00 a.m. bulk Ferment for 2-3 hours
- 2:00 p.m. shape and put in refrigerator
- 5:00 p.m. bake in time for supper
- OR
- 7:00 a.m. the next morning – bake in time for breakfast (this is perfect for fresh cinnamon raisin bread)
Option 2 (this would work great if you work away from the house all day)
- 7:00 a.m. Feed your sourdough starter
- 5:30 p.m. Mix your ingredients
- 5:45 p.m. Add salt and begin your stretch and folds every 15 minutes (since this will be a tigher timeline)
- 7:00 p.m. Bulk ferment on counter for 2 hours
- 9:00 p.m. Shape and put into the refrigerator
- 6:00 a.m. Bake
Keys To Success
Thick active sourdough starter
If you have a weak or runny sourdough starter, you’re gonna have flat and sloppy dough. It’s really important to start with a strong and active starter. Learn how to make a healthy sourdough starter without using a scale here. When you’re preparing to make bread especially, be sure to mix your starter thickly – with more flour than water. You want your starter to have a thick pancake like consistency.

Create Good Internal Structure In Your Dough
Do stretch and folds or coil folds on your dough every few minutes until it has good structure and holds it shape.
Don’t Overferment
Don’t overferment your dough. Try not to forget the dough sitting on the counter for more than 2-3 hours during the bulk fermentation time. If you overferment your dough it won’t hold it’s shape and will be a sloppy mess. If you get interrupted before the bulk ferment is done and need to leave, just put it in the refrigerator. You can always shape it after it’s been in the refrigerator. Once again, it’s very flexible, but try not to let it sit out on the counter until it ferments into a sloppy ball or it won’t raise much in the oven.
Frequently Asked Questions
Sourdough starter is a fermented mix of flour and water that has captured the wild yeast that is in your environment. It uses this yeast to raise your bread so you don’t have to purchase store bought yeast in order to make sourdough artisan bread. As long as you have access to flour, water and salt, you can make this traditional bread.
What makes artisan sourdough bread different from other kinds of artisan bread is that it’s made using sourdough starter which has natural yeast in it. This yeast is captured by the fermented flour and water during the fermentation process. This wild yeast is what raises your bread, meaning you don’t need commercial yeast from the grocery store in order to make artisan sourdough bread. Artisan bread made with sourdough starter is much healthier for you and easier for your body to digest. If you purchase artisan sourdough bread from the store for example, and it has commercial yeast in it, then it is not really sourdough bread. It is just regular artisan bread made with commercial yeast.
Yes, you can. It will take longer to create good internal structure in the dough and it may not rise as well, but you can still make this recipe with discard. If you are new to sourdough, I would highly recommend making it with active sourdough starter instead of discard, but if you forget to feed your starter and still need to make bread, it will still work.
Yes, artisan sourdough bread is healthier than yeast bread because of the phytic acid that is broken down during the fermentation process. A lot of people that are gluten intolerant can eat long fermented sourdough bread without any digestion issues. Sourdough bread also has a lower glycemic index than regular yeast bread and when eaten with a meal it actually lowers the glycemic level of the entire meal. This is really important for people that are diabetic. More information on the glycemic level of sourdough bread here.
Beetroot powder is a concentrated powder made from dehydrated and ground beets. It's a popular supplement that's often promoted as a superfood or used as a natural pigment in cooking.
The best flour to use is a bread flour with a protein content of at least 11-14%. My favorite flour for bread baking is from Azure Standard. However, you can make this artisan sourdough bread with whatever flour you have on hand. I’ve made many loaves with bleached all purpose flour and they turn out just fine. If you plan to use whole wheat or whole grain flour, it’s best to make to use half whole grain and half all purpose flour.
Artisan sourdough bread is made in small batches with fresh ingredients and is often made in a round shape called a boule.
You’ll want to bake bread with a sourdough starter that has been recently fed and has at least doubled, if not tripled in size. When you feed your sourdough starter you want it to be the consistency of a thick pancake batter. This is what will give you a really strong starter. Once it’s at it’s peak, you can also do the float test by taking a spoonful of the starter and place it in water. If it floats, it is ready to bake with.
Sourdough bread keeps a lot longer than regular yeast bread because of the fermentation process it goes through while being made. If you keep it wrapped in a beeswax wrap or in a plastic bag, it will keep on your counter for up to two weeks.
Yes, you can freeze artisan sourdough bread. Just wrap it in plastic wrap or place it into a freezer bag and freeze for up to 3 months. To thaw, set it out on the counter until it comes to room temperature. Can be reheated in 350 degree oven for 15 minutes for a fresh chewy sourdough texture.


This post contains affiliate links, which means I make a small commission at no extra cost to you. See my full disclosure here
How To Make This Pink Artisan Sourdough Bread Recipe
Feed Starter
Feed starter 4-12 hours before mixing up your dough
Mix Ingredients
To one mixing bowl, add the ingredients for the pink dough. To the second mixing bowl, add the ingredients for the plain dough. Mix each until they come together into a shaggy dough ball. Let the dough rest for 15-30 minutes to “autolyse”. This just means you’re giving the flour a chance to absorb the water and the starter.

You can wait and add the salt after a few minutes, or add it to the dough when you mix it up.
Create Structure In Your Dough
Begin creating structure in each ball of dough by doing a series of stretch and folds, coil folds and/or lamination every 15-30 minutes. You will know your dough has good structure when it holds it shape and starts getting some bubbles on top. Sometimes I only do 2-3 stretch and folds before letting it bulk ferment if I’m in a hurry, but I try to also do 2-3 coil folds and one lamination.

Bulk Ferment
Cover bowls with a loose fitting lid like a plate and leave it in the bowl at room temperature for 2-3 hours to bulk ferment.
Shape
Turn dough out onto the counter. Wet your hands so the dough doesn’t stick to your fingers, and gently spread either the plain or the colored dough out in a rectangle as thin as you can without tearing it. Whichever color you want on the outside of your loaf is the color you’ll lay down first. Add inclusions if desired. Spread the other color of dough on top of the first layer of dough.


Take ⅓ of the dough from one side of the rectangle and fold it towards the middle. Do the same with the other side of the dough, bringing it over the top of the other side of the dough. This will create the beautiful swirl in the bread. Roll up the dough into a ball and create surface tension on the ball by pushing it away from you and then pulling it back towards you several times. Creating tension on the dough will help you shape the sticky dough.
Cold Ferment
Place dough upside down in a banneton or tea towel and flour lined bowl. Cover with cloth or plastic wrap and place in the refrigerator for 2-12 hours. Keep in mind that the dough will raise some while in the refrigerator, but it may not double in size like yeast bread. It does a lot of its raising while baking. Remember, this is very different than baking regular yeast bread.

Preheat Oven
There are two ways you can bake this bread. In a dutch oven or without a dutch oven as an “open baked” loaf. Either method works well. If using the dutch oven method, be sure to place your dutch oven in your oven while it preheats to 450 degrees.
Score
When oven is hot, take sourdough out of the refrigerator and dump it out onto a sheet of parchment paper. Your dough should still be holding it’s shape. Brush gently with flour (rice flour makes the scoring stand out the best, but is optional). Score the top of the dough about ¼” deep using whatever designs you desire. I like to make a heart for Valentine’s day, etc.

Bake
Dutch Oven Method
Remove your pre-heated dutch oven from the oven. Remove lid and quickly place parchment paper with bread on it into the hot dutch oven. Replace lid and quickly place it back into the oven. Place a baking sheet on the rack under the dutch oven so the bottom of the loaf doesn’t end up too hard and crusty.

Open Bake Method
Place parchment paper with bread on it onto a baking sheet or pizza stone and place it into the oven. Below it place a baking sheet or pan and pour boiling water into it to create steam. This will help to give your bread a crispy crust with a fluffy inside and will replicate the dutch oven baking.
Reduce heat to 425 degrees and bake for 25 minutes.
Remove the lid if using a dutch oven.
Bake for 15 more minutes until the loaf is a nice golden brown.
Remove bread from the oven and place on a cooling rack.

Slice and Enjoy
For best results, wait until bread is cool to slice. The easiest way to slice artisan sourdough bread is to cut it in half, and then lay the halves flat and slice.

If you have never made sourdough bread, I encourage you to take the plunge and try it. After making it a couple times, you won’t even need to look at the recipe. Sourdough bread is all about understanding the process of what happens with the dough, and the easiest way to understand that is to just do it! It’s easiest to learn by doing. Everything you learn may seem foreign to you at first, but after a few tries you will get the hang of it and be baking sourdough with the best of them. If you have any questions as you learn about sourdough and begin your baking journey, please don’t hesitate to reach out. I am here to help you and want to see you succeed! Remember – you can do this and it is so rewarding! Happy baking friends!
Pin For Later

Pink Swirled Artisan Sourdough Bread Recipe
Equipment
- 1 Two medium-sized mixing bowls - one for each color of dough
- 1 Measuring cups
- 1 Danish whisk
- 1 Bench scraper
- 1 Bread Lame
- 1 Scoring Tool or Razor Blade
- 1 Banneton proofing basket (you can also use a towel-lined bowl)
- 1 parchment paper
- 1 Cast Iron Dutch Oven (optional)
Ingredients
- Pink Dough
- ¾ cup water
- ¼ cup sourdough starter
- ¼ cup beet root powder
- ½ Tablespoon salt
- 1 ¾ cups flour
- White Plain Dough
- ¾ cup water
- ¼ cup sourdough starter
- ½ Tablespoon salt
- 1 ¾ cups flour
Instructions
Feed Starter
- Feed starter 4-12 hours before mixing up your dough
Mix Ingredients
- To one mixing bowl, add the ingredients for the pink dough. To the second mixing bowl, add the ingredients for the plain dough. Mix each until they come together into a shaggy dough ball. Let the dough rest for 15-30 minutes to “autolyse”. This just means you’re giving the flour a chance to absorb the water and the starter.
- You can wait and add the salt after a few minutes, or add it to the dough when you mix it up.
Create Structure In Your Dough
- Begin creating structure in each ball of dough by doing a series of stretch and folds, coil folds and/or lamination every 15-30 minutes. You will know your dough has good structure when it holds it shape and starts getting some bubbles on top. Sometimes I only do 2-3 stretch and folds before letting it bulk ferment if I’m in a hurry, but I try to also do 2-3 coil folds and one lamination.
Bulk Ferment
- Cover bowls with a loose fitting lid like a plate and leave it in the bowl at room temperature for 2-3 hours to bulk ferment.
Shape
- Turn dough out onto the counter. Wet your hands so the dough doesn’t stick to your fingers, and gently spread either the plain or the colored dough out in a rectangle as thin as you can without tearing it. Whichever color you want on the outside of your loaf is the color you’ll lay down first. Add inclusions if desired. Spread the other color of dough on top of the first layer of dough.
- Take ⅓ of the dough from one side of the rectangle and fold it towards the middle. Do the same with the other side of the dough, bringing it over the top of the other side of the dough. This will create the beautiful swirl in the bread. Roll up the dough into a ball and create surface tension on the ball by pushing it away from you and then pulling it back towards you several times. Creating tension on the dough will help you shape the sticky dough.
Cold Ferment
- Place dough upside down in a banneton or tea towel and flour lined bowl. Cover with cloth or plastic wrap and place in the refrigerator for 2-12 hours. Keep in mind that the dough will raise some while in the refrigerator, but it may not double in size like yeast bread. It does a lot of its raising while baking. Remember, this is very different than baking regular yeast bread.
Preheat Oven
- There are two ways you can bake this bread. In a dutch oven or without a dutch oven as an “open baked” loaf. Either method works well. If using the dutch oven method, be sure to place your dutch oven in your oven while it preheats to 450 degrees.
Score
- When oven is hot, take sourdough out of the refrigerator and dump it out onto a sheet of parchment paper. Your dough should still be holding it’s shape. Brush gently with flour (rice flour makes the scoring stand out the best, but is optional). Score the top of the dough about ¼” deep using whatever designs you desire. I like to make a heart for Valentine’s day, etc.
Bake
Dutch Oven Method
- Remove your pre-heated dutch oven from the oven. Remove lid and quickly place parchment paper with bread on it into the hot dutch oven. Replace lid and quickly place it back into the oven. Place a baking sheet on the rack under the dutch oven so the bottom of the loaf doesn’t end up too hard and crusty.
Open Bake Method
- Place parchment paper with bread on it onto a baking sheet or pizza stone and place it into the oven. Below it place a baking sheet or pan and pour boiling water into it to create steam. This will help to give your bread a crispy crust with a fluffy inside and will replicate the dutch oven baking.
- Reduce heat to 425 degrees and bake for 25 minutes.
- Remove the lid if using a dutch oven.
- Bake for 15 more minutes until the loaf is a nice golden brown.
- Remove bread from the oven and place on a cooling rack.


Fun
This recipe is delicious!