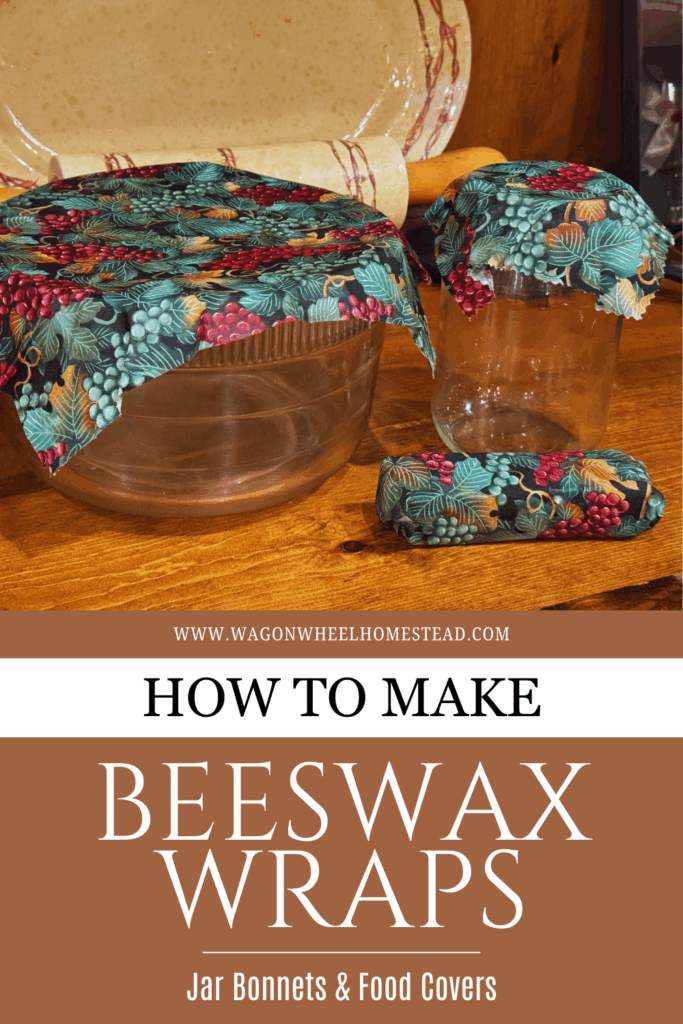
How To Make Beeswax Wraps, Jar Bonnets & Food Covers
Learn how to beeswax wraps, jar bonnets, food covers and butter wrappers in this step-by-step tutorial. These eco-friendly beeswax food wraps are simple and easy to make, and will help you avoid using plastic wrap in your kitchen when storing or transporting food. There’s nothing more beautiful than a dish covered in a handmade beeswax wrap. Perfect to use when transporting dishes to a potluck, or when gifting food to a friend. They are much less expensive than store-bought beeswax wraps and take only a little time to make. Make plenty of these food safe wraps to have in your own kitchen, and make some extra sets to give away as gifts.

Have you ever thought about what they used back in the old days before plastic was around? How did they store their food? Well, oftentimes they stored it in jars with lids, but they also used reusable covers for their containers made out of beeswax and fabric scraps leftover from sewing projects.
These reusable beeswax wraps can easily be made in different sizes to meet your specific needs. I like to make jar bonnets, bowl covers, casserole covers, and butter wrappers. Making a whole set of these wraps and gifting them to a bride-to-be, would make an amazing gift! It's a really fun and satisfying DIY project.
What Are Beeswax Wraps?
Beeswax wraps are made by slowly melting beeswax into a cotton fabric. This makes the fabric air-tight and moldable, so it will fit over a bowl or a mason jar, or even a stick of butter. Instead of searching through a million plastic lids in your drawer to fit the specific plastic container in which your food is stored, you can just put a beeswax wrap over the container and put it in the refrigerator. In fact, if you’d like to ditch the plastic altogether, you can just keep a few glass or stainless steel bowls around, and cover them with beeswax wraps before placing them in the refrigerator. Simple is always better!

Ways We Like To Use Beeswax Wraps
- As a plastic wrap alternative for covering all of our containers in the refrigerator
- For wrapping sticks of homemade butter
- You can easily make these beeswax wraps into bread bags for storing your sourdough bread so it doesn’t mold and doesn’t dry out.
- For covering jars of sourdough starter or fermenting vegetables on the counter, or jars of buttermilk in the refrigerator.
- They make a great sandwich covers or snack bags as they can easily be molded into any shape with just the warmth of your hands.

Tips For Making Reusable Food Wraps
- You can make them in the oven or with your iron, either way works great.
- Grated beeswax or beeswax pellets both work fine or this project.
- Try to think of all the ways you use plastic wrap in your kitchen. Then cut pieces of fabric the right size for all of those projects, and make up all your beeswax wraps at once.
- To wash these wraps, just rinse under warm (not hot) water. You can use mild soap if needed. They come clean immediately. I do not recommend running them through the washing machine as the beeswax may come off in the hot water.
- Store them folded up in one of your kitchen drawers, ready for use anytime.
FAQ
Cotton is the best kind of fabric to use for beeswax wraps. Other kinds of fabric don’t soak up the beeswax as nicely.
No, these wraps are moldeable and stick themselves just fine without any oil or pine resin added to the beeswax.
Yes, beeswax has natural antimicrobial properties, and is safe to use around food
You can order 100% cotton fabric from Amazon or other places online, or from your local fabric store.
It depends on the size of the covers you are making, but in general it takes about 1 oz. of beeswax for a 12” x 12” piece of fabric. I just grate a few ounces, and it always makes several wraps. You’ll see in the video how it soaks into the fabric, leaving any excess wax behind for use on the next wrap.
You can usually find a beekeeper in your local area that will sell you beeswax. If it needs to be cleaned of any impurities, you can melt it down in an old pot on your stovetop as long as you put that pot over the top of another pot with water in it, creating a double boiler. Slowly melt the wax, and as it melts, pour it into old plastic containers (like yogurt and sour cream containers from the grocery store). Anything plastic and somewhat pliable will work. You can put the containers on a scale as you fill them if you wish, to measure how much wax will be in each brick. When the wax cools, you can just pop it out of these containers, and you’ll have small wax bricks that are perfect for making lots of things like lip balm, lotion bars, beewsax wraps and more.
Beeswax wraps will last a long time with proper care and cleaning. If they start to feel less sticky, you can always revive them by adding more beeswax.
No, beeswax wraps are not microwaveable because it can melt the wax out of the fabric.


This post contains affiliate links, which means I make a small commission at no extra cost to you. See my full disclosure here

How To Make Your Own Homemade Beeswax Wraps
Wash and dry fabric before starting the project.
Cut the fabric into your desired sizes.

Grate beeswax block using a cheesegrater if it’s not already in pellet form.
Iron Method
Plug in your iron, and turn it on the low cotton setting. Also adjust the settings so there is no steam coming from the iron.
Place a piece of parchment paper on a baking sheet.
Lay fabric on the parchment paper and sprinkle it evenly with the beeswax.

Place another piece of parchment paper on top of the fabric and beeswax.

Put the warm iron on top of the parchment paper, and slowly move it back and forth to melt in the beeswax. The parchment paper will turn translucent where there is enough beeswax melted into the fabric. This allows you to easily see the spots where you might need to add some more beeswax. Make sure that the edges of the wraps are well covered.
When you are satisfied that the fabric has been evenly coated in beeswax, remove the fabric from under the parchment paper, and hang it up to dry (it only takes a few seconds).

You’ll want to keep using the same pieces of parchment paper for making all of your wraps because any leftover wax that wouldn’t soak into the fabric, will be left on the parchment paper, and just soak into the next piece of fabric.

Once you’re done making all of your wraps, you can just dispose of the parchment paper, and put your iron and baking sheet away. Simple as that! By the way, this is the fastest method for making these beeswax wraps.
Oven Method
For the oven method, you’ll need an old paintbrush that you’re willing to throw away when you’re done.
Turn your oven on to 170 degrees, (not any warmer because beeswax can be flammable at high temperatures).
On a baking sheet lay out a sheet of parchment paper.
Place the fabric on the parchment paper, and sprinkle evenly with beeswax.
Put the baking sheet into the preheated oven, and lay the paintbrush on the edge of the parchment paper so it will get warm as well.
After a few minutes, remove the baking sheet from the oven, and use the paintbrush to spread the beeswax evenly to all parts of the fabric. Add more beeswax if necessary. If there is extra wax, it will soak into the next piece of fabric you make into a wrap.
Remove the wrap from the oven and hang it up to dry (it only takes a couple of minutes).
Add more fabric and wax to the oven until all of your beeswax wraps are made.
And that’s it! I hope you’ll enjoy using your own beeswax wraps in your kitchen as much as I do. I so appreciate not having to buy plastic wrap. There’s such a satisfying feeling that comes when you follow in the steps of your ancestors, and do things the old fashioned, eco-friendly way.
Pin For Later

How To Make Beeswax Wraps, Jar Bonnets & Food Covers
Equipment
- 1 Baking sheet
- 1 Iron
- 1 Sewing Scissors
- 1 Oven and a paintbrush (if using this method)
- 1 100% cotton fabric
- 1 Pure beeswax pellets, or you can grate your own
- 1 parchment paper
Materials
- 100 % cotton fabric
- Pure beeswax pellets or you can grate your own
- Parchment Paper
Instructions
- Wash and dry fabric before starting the project.
- Cut the fabric into your desired sizes.
- Grate beeswax block using a cheesegrater if it’s not already in pellet form.
Iron Method
- Plug in your iron, and turn it on the low cotton setting. Also adjust the settings so there is no steam coming from the iron.
- Place a piece of parchment paper on a baking sheet.
- Lay fabric on the parchment paper and sprinkle it evenly with the beeswax.
- Place another piece of parchment paper on top of the fabric and beeswax.
- Put the warm iron on top of the parchment paper, and slowly move it back and forth to melt in the beeswax. The parchment paper will turn translucent where there is enough beeswax melted into the fabric. This allows you to easily see the spots where you might need to add some more beeswax. Make sure that the edges of the wraps are well covered.
- When you are satisfied that the fabric has been evenly coated in beeswax, remove the fabric from under the parchment paper, and hang it up to dry (it only takes a few seconds).
- You’ll want to keep using the same pieces of parchment paper for making all of your wraps because any leftover wax that wouldn’t soak into the fabric, will be left on the parchment paper, and just soak into the next piece of fabric.
- Once you’re done making all of your wraps, you can just dispose of the parchment paper, and put your iron and baking sheet away. Simple as that! By the way, this is the fastest method for making these beeswax wraps.
Oven Method
- For the oven method, you’ll need an old paintbrush that you’re willing to throw away when you’re done.
- Turn your oven on to 170 degrees, (not any warmer because beeswax can be flammable at high temperatures).
- On a baking sheet lay out a sheet of parchment paper.
- Place the fabric on the parchment paper, and sprinkle evenly with beeswax.
- Put the baking sheet into the preheated oven, and lay the paintbrush on the edge of the parchment paper so it will get warm as well.
- After a few minutes, remove the baking sheet from the oven, and use the paintbrush to spread the beeswax evenly to all parts of the fabric. Add more beeswax if necessary. If there is extra wax, it will soak into the next piece of fabric you make into a wrap.
- Remove the wrap from the oven and hang it up to dry (it only takes a couple of minutes).
- Add more fabric and wax to the oven until all of your beeswax wraps are made.
Notes
Tips For Making Reusable Food Wraps
- You can make them in the oven or with your iron, either way works great.
- Grated beeswax or beeswax pellets both work fine or this project.
- Try to think of all the ways you use plastic wrap in your kitchen. Then cut pieces of fabric the right size for all of those projects, and make up all your beeswax wraps at once.
- To wash these wraps, just rinse under warm (not hot) water. You can use mild soap if needed. They come clean immediately. I do not recommend running them through the washing machine as the beeswax may come off in the hot water.
- Store them folded up in one of your kitchen drawers, ready for use anytime.


Very clear instructions thank you. Going to try both methods....
You're welcome!
Very clear instructions thank you
When using the iron method I usually just use a rather large piece of fabric.
Once the Beeswax has been melted, then I cut individual pieces to the size I need.
This allows for beeswax to melt all the way to the edges of each piece.
Works like a charm.
Great idea! Thanks for sharing!